Waterfall Braid Tutorial: A Romantic Hairstyle for Any Occasion

Waterfall Braid Tutorial: A Romantic Hairstyle for Any Occasion

The waterfall braid is a stunning and versatile hairstyle that adds a touch of whimsy and romance to any occasion. It's a step up from the classic three-strand braid, but still relatively simple to learn. This tutorial will guide you through creating a beautiful waterfall braid, perfect for weddings, date nights, or even elevating your everyday look.

Why You'll Love the Waterfall Braid:

  • Easy to Learn: While it might look intricate, the waterfall braid requires just a basic understanding of braiding.
  • Eye-Catching Appeal: The cascading effect of the braid adds a touch of elegance and visual interest to your hairstyle.
  • Versatility: This braid can be dressed up or down depending on the occasion. Add some flowers for a formal event or wear it loose for a more casual look.
  • Partial Braid: The waterfall braid doesn't require braiding your entire head, making it a great option for shorter hair or for adding a braided detail to a half-up, half-down hairstyle.

What You'll Need:

  • Brush or comb
  • Hair tie (optional)
  • Bobby pins (optional)

Waterfall Braid Steps:

  1. Prep Your Hair: Begin with dry, detangled hair. Brush your hair thoroughly to ensure a smooth braiding experience.

  2. Start a Basic Braid: On the desired side of your head (left or right), separate a small section of hair near your hairline into three equal strands. Weave a basic three-strand braid for a couple of sections.

  3. The Waterfall Effect: Here's the magic! As you go to incorporate the bottom strand (let's call it strand A) into the braid, instead of crossing it over the middle strand, drop it down and release it from the braid.

  4. Pick Up a New Strand: At the same time you release strand A, pick up a new, thin section of hair from above the section you just dropped (where strand A originated). Add this new section to what was previously the middle strand (now the bottom strand).

  5. Continue Braiding: Cross the new strand (which came from above) over the remaining middle strand to continue the braid. This becomes your new middle strand.

  6. Repeat the Waterfall: Repeat steps 3-5 for each subsequent section. Remember to drop the original bottom strand and incorporate a new, thin section from above with each repetition.

  7. Continue Braiding or Finish Up: You can continue braiding the entire length of your hair in this waterfall pattern, or transition to a regular three-strand braid towards the end for a more secure finish.

  8. Secure the Braid: Use a hair tie to secure the end of the braid, or tuck the end under and bobby pin it in place for a more seamless look.

Tips for a Flawless Waterfall Braid:

  • Practice Makes Perfect: Don't get discouraged if your first attempt isn't perfect. The more you practice, the smoother and more even your waterfall braid will become.
  • Maintain Tension: Gently but firmly hold the braid sections as you move down to ensure a neat and even braid.
  • Adjust for Hair Length: For shorter hair, use smaller sections and consider incorporating the waterfall braid just for a portion of your hair.
  • Accessorize (Optional): Add flowers, ribbons, or hair clips to personalize your waterfall braid and enhance the romantic look.

With a little practice, you'll be braiding beautiful waterfall braids in no time! This versatile hairstyle is a great way to add a touch of elegance and romance to your look, making it perfect for any occasion. So grab your brush and get braiding!

Beach Waves with a Flat Iron: Effortless Summer Hair All Year Round

Beach Waves with a Flat Iron: Effortless Summer Hair All Year Round


Dreaming of those surfer-girl waves that whisper of sunshine and sandy shores? You don't need a trip to the beach to achieve that effortless, tousled look. With a trusty flat iron and a few simple techniques, you can create beautiful beach waves right at home, any time of year.

Benefits of Using a Flat Iron for Beach Waves:

  • Faster Styling: Compared to curling irons that require individual curl formation, flat irons can create waves in larger sections, saving you precious time.
  • Versatility: By adjusting the section size and direction of the flat iron, you can achieve a range of wave styles, from loose and beachy to more defined waves.
  • Heat Protectant is Key: Always use a heat protectant spray before using any heat styling tool, including a flat iron, to minimize heat damage.

What You'll Need:

  • Flat iron (1-inch or wider plates recommended)
  • Heat protectant spray
  • Brush or comb
  • Hair clips (optional)
  • Texturizing spray (optional)

Creating Beach Waves with a Flat Iron:

  1. Prep Your Hair: Start with dry, detangled hair. Apply a heat protectant spray evenly throughout your hair to shield it from heat damage.

  2. Section Your Hair: For looser waves, use larger sections. For tighter waves, use smaller sections. Clip the top sections of your hair out of the way to work on the bottom layers first.

  3. Clamp and Twist: Clamp the flat iron down on a section of hair near the roots, leaving about an inch of hair from the ends loose. Here's the key to beach waves: instead of flipping the iron outwards for curls, twist your wrist slightly as you clamp and glide the iron down the hair section. This creates a slight S-shape, mimicking a natural beach wave.

  4. Repeat and Alternate: Release the hair and repeat the clamp-and-twist motion with the next section. Alternate the direction of the twist (one section inwards, the next outwards) for a more natural wave pattern.

  5. Work Your Way Up: Continue sectioning and using the clamp-and-twist technique to style the rest of your hair, working your way up to the top sections you clipped earlier.

  6. Loosen and Texturize (Optional): Once all sections are styled, gently run your fingers through your hair to break up the waves and create a more relaxed, beachy look. For extra texture and volume, you can mist a texturizing spray throughout your hair.

Pro Tips for Beach Waves with a Flat Iron:

  • Don't Dwell: Don't hold the flat iron on any section for too long to avoid heat damage. A quick glide with the twist is all you need.
  • Experiment with Temperature: Start with a lower heat setting and increase gradually if needed. The appropriate temperature will depend on your hair type.
  • Embrace Imperfection: Beach waves are all about a natural, effortless look. Don't worry about achieving perfect uniformity.

With these tips and a little practice, you'll be a beach wave pro in no time! This easy hairstyle is perfect for adding a touch of summer vibes to your look, no matter the season.

French Twist for Short Hair: A Quick and Elegant Updo

French Twist for Short Hair: A Quick and Elegant Updo

Short hair doesn't have to limit your updo options! The French twist, a classic hairstyle known for its sophistication, can be adapted for shorter hair lengths with stunning results. This guide will show you how to achieve a quick and elegant French twist, perfect for any occasion, even with short hair.

Benefits of a French Twist for Short Hair:

  • Polished Look: The French twist instantly adds a touch of elegance and sophistication to your short hairstyle.
  • Versatility: This updo can be dressed up or down depending on the occasion. Add some sparkle with hair accessories for a formal event, or keep it simple for a more casual look.
  • Time-Saving: This style can be achieved in just a few minutes, making it ideal for busy mornings or quick hairstyle changes.
  • Manageable Short Hair: The French twist helps tame flyaways and keeps your short hair neat and under control.

What You'll Need:

  • Brush or comb
  • Bobby pins (enough to secure the twist)
  • Optional: Hairspray for added hold

Creating the French Twist:

  1. Prep Your Hair: Start with dry, detangled hair. Apply a light styling product, like mousse or hairspray, for better hold if needed.

  2. Create a Deep Side Part: Part your hair deeply to one side. This will provide enough hair for the twist and frame your face nicely.

  3. Gather and Twist: Using your fingers, gather most of your hair on the non-parted side, leaving a few strands loose for framing the face (optional). Begin twisting the gathered hair upwards and inwards, towards the back of your head.

  4. Secure the Base: Once you have a good twist going, hold it in place with your non-dominant hand. Use bobby pins to secure the base of the twist at the back of your head. Push the pins horizontally through the base of the twist for maximum hold.

  5. Incorporate the Ends: Continue twisting the remaining hair and tuck the ends underneath the existing twist. Secure them with additional bobby pins, making sure they are hidden from view.

  6. Refine and Polish: Use your fingers to gently smooth out any flyaways and adjust the overall shape of the twist for a polished look.

  7. Finishing Touches (Optional): For a touch of glamour, add a decorative bobby pin or hair clip to the side of the twist. You can also use a light mist of hairspray to ensure the style stays put throughout the day.

French Twist Variations for Short Hair:

  • Messy French Twist: For a more relaxed look, loosen the twist slightly and pull out a few wisps of hair around the face.
  • Braided French Twist: Incorporate a small braid along the side of your head before twisting the hair for an added touch of detail.
  • Double French Twist: For a bolder look, create two smaller French twists on either side of your head and secure them together at the back.

With a little practice, you'll be a master of the French twist for short hair in no time. This versatile updo is a perfect way to add elegance and sophistication to your short hairstyle, all while keeping things quick and easy!

Braiding Basics: Mastering the Simple Braid for Beginners

Braiding Basics: Mastering the Simple Braid for Beginners


Braids are a timeless and versatile hairstyle that can be dressed up or down for any occasion. But for those new to hairstyling, even a simple braid can seem daunting. Fear not! This guide will break down the braiding process into easy-to-follow steps, making you a braiding pro in no time.

What You'll Need:

  • Brush or comb
  • Hair tie (optional)

Getting Started:

  1. Detangle Your Hair: Begin with dry, tangle-free hair. Brush or comb your hair thoroughly to remove any knots that might disrupt the braiding process.

  2. Section Your Hair: Part your hair at your desired location – center, side, or wherever you prefer your braid to begin. For a basic three-strand braid, use your fingers to separate your hair into three equal sections at the nape of your neck.

Braiding Magic:

  1. The First Stitch: Hold the right section in your right hand, the middle section in your thumb and index finger of your left hand, and the left section in your left hand. Now comes the magic! Take the right section and cross it over the middle section. It becomes the new "middle" section.

  2. Repeat and Conquer: Here comes the rhythm! Take the left section and cross it over the new middle section (which was previously the right section). This becomes your new middle section.

  3. Maintain Tension: As you continue braiding, gently but firmly hold all three sections with your fingers. This ensures a neat and even braid.

  4. Incorporate New Hair (Optional): For a thicker braid, you can progressively add hair to the braid as you move down. Here's how: When you cross the right section over to become the middle section, grab a small, thin section of hair from the right side of your head and add it to the right section before crossing it over. Repeat this process on the left side as you incorporate the left section into the middle.

  5. Continue Braiding: Keep repeating steps 2 and 3 (with optional hair incorporation) until you reach the end of your hair.

  6. Finishing Touches: Secure the braid with a hair tie. You can use a clear elastic for a more discreet look or a colorful one to add a pop of personality.

Pro Tips for Beginners:

  • Practice Makes Perfect: Don't get discouraged if your first braid isn't perfect. The more you practice, the smoother and tighter your braids will become.
  • Start Simple: Master the basic three-strand braid before venturing into more complex styles.
  • Work with Small Sections: If you're a complete beginner, start with smaller sections of hair for a more manageable braid.
  • Use Hairspray (Optional): A light spritz of hairspray can help keep your braid in place throughout the day, particularly if your hair is fine or prone to frizz.

With a little practice and these helpful tips, you'll be braiding like a pro in no time! Now you can add braids to your hairstyles, create fun updos, or simply rock a classic braid for a timeless look. So, grab your brush and get braiding!

Hair Loss in Women: Understanding Alopecia and Finding Solutions

Hair Loss in Women: Understanding Alopecia and Finding Solutions

Hair loss, also known as alopecia, is a surprisingly common concern for women. While it's often associated with men, millions of women experience hair thinning or baldness at some point in their lives. This article explores the different types of alopecia in women, their causes, treatment options, and ways to cope with hair loss.

Understanding Alopecia

Alopecia refers to any condition that results in hair loss. It can be temporary or permanent, and the severity can vary greatly. Hair loss can affect the scalp or the entire body. There are several different types of alopecia, each with its own characteristics:

  • Androgenetic Alopecia (Female Pattern Hair Loss): This is the most common type of hair loss in women, affecting millions. It's characterized by a gradual thinning of hair on the top and crown of the scalp, often with a widening part line. Genetics and hormonal changes play a role.
  • Telogen Effluvium: This type of hair loss involves a sudden increase in hair shedding, often triggered by stress, illness, childbirth, significant weight loss, or nutritional deficiencies. It's usually temporary, and hair typically grows back within a few months.
  • Alopecia Areata: This autoimmune disorder causes round patches of hair loss anywhere on the body, including the scalp, eyebrows, and eyelashes. The cause is unknown, but it can be triggered by stress.
  • Cicatricial Alopecia (Scarring Alopecia): This type of hair loss occurs when the hair follicle is permanently damaged by inflammation or scarring, preventing new hair growth. It can be caused by conditions like scalp burns, infections, or certain hairstyles that put excessive tension on the hair.

Causes of Alopecia in Women

The causes of alopecia in women vary depending on the type. Here's a breakdown of some common factors:

  • Genetics: Androgenetic alopecia has a strong genetic link.
  • Hormones: Fluctuations in estrogen and androgen levels can contribute to hair loss, particularly after pregnancy, menopause, or due to hormonal imbalances like polycystic ovary syndrome (PCOS).
  • Stress: Severe or chronic stress can trigger telogen effluvium.
  • Medical Conditions: Certain medical conditions, medications, and surgeries can cause hair loss as a side effect.
  • Nutrient Deficiencies: Deficiencies in iron, vitamin D, or other essential nutrients can contribute to hair loss.
  • Hairstyles: Hairstyles that pull tightly on the hair, such as braids or cornrows, can lead to a type of alopecia called traction alopecia.

Diagnosing Alopecia

If you're experiencing hair loss, it's important to see a dermatologist for diagnosis. They will typically discuss your medical history, family history, and examine your hair and scalp. Depending on the suspected cause, they may recommend blood tests or a scalp biopsy to confirm the diagnosis.

Treatment Options for Alopecia

There is no one-size-fits-all cure for alopecia. However, several treatment options can help slow down hair loss, promote new hair growth, or conceal thinning hair:

  • Medications: Minoxidil is a topical medication that can be effective for treating androgenetic alopecia in women. Other medications like spironolactone may be used to address hormonal imbalances.
  • Laser Therapy: Low-level laser light therapy is a non-invasive option that may stimulate hair growth.
  • Hair Transplant Surgery: This surgical procedure involves transplanting hair follicles from a donor area of the scalp to a balding area.
  • Hairpieces and Wigs: These can provide a natural-looking hair covering for women with significant hair loss.

Coping with Hair Loss

Hair loss can be emotionally challenging. It's important to remember that you're not alone. Here are some tips for coping:

  • Talk to someone: Expressing your concerns to a therapist, counselor, or support group can be helpful.
  • Focus on what you can control: While you may not be able to stop hair loss entirely, you can focus on healthy hair habits like eating a balanced diet, managing stress, and using gentle hair care products.
  • Explore different hairstyles: There are many hairstyles that can flatter women with hair loss. Consider working with a hairstylist to find styles that work for you.
  • Embrace your beauty: Hair loss doesn't define your beauty. There are many ways to express yourself and feel confident, with or without hair.

Living with alopecia can be difficult, but with the right diagnosis, treatment, and support system, you can manage your hair loss and feel good about yourself. If you're concerned about hair loss, reach out to a dermatologist to discuss your options and find a treatment


Beachy Waves for Everyone: The Ultimate Guide to Bed Head Wavers

Beachy Waves for Everyone: The Ultimate Guide to Bed Head Wavers


If you crave those effortless, tousled waves that look like you just stepped off the beach, then a bed head waver might be your new best friend. But with so many options on the market, choosing the right one can be overwhelming. This guide will delve into everything you need to know about bed head wavers, from how they work to picking the perfect one for your hair type and desired style.

What is a Bed Head Waver?

Unlike curling irons that create tight ringlets, a bed head waver creates those loose, natural-looking waves. It typically consists of two or three connected barrels that clamp down on your hair, leaving behind a defined wave pattern. Bed Head is a popular brand that offers various waver models, but the term "bed head waver" has become synonymous with this type of hairstyling tool in general.

Benefits of Using a Bed Head Waver

  • Versatility: You can achieve various wave styles depending on the size of the waver barrels and the section size of your hair.
  • Natural-looking waves: Unlike curling irons, wavers create looser, more relaxed waves that look effortless.
  • Faster styling: Compared to curling irons that require sectioning and individual curl formation, wavers can style larger sections of hair at once, saving you time.
  • Frizz reduction: Many bed head wavers use tourmaline ceramic technology, which helps reduce frizz and adds shine to your hair.

Choosing the Right Bed Head Waver

  • Barrel size: Larger barrels create looser, beachy waves, while smaller barrels create tighter, more defined waves.
  • Heat settings: If you have fine hair, you'll need a lower heat setting to avoid damage. Thicker hair can handle higher heat.
  • Hair type: Some wavers have features specifically designed for certain hair types, such as extra-long barrels for long hair.

How to Use a Bed Head Waver

  1. Prep your hair: Start with dry, detangled hair. Apply a heat protectant spray to minimize heat damage.
  2. Section your hair: For looser waves, use larger sections. For tighter waves, use smaller sections.
  3. Clamp and hold: Clamp the waver onto your hair section, holding it for a few seconds depending on your hair thickness and desired wave definition.
  4. Repeat: Continue working your way down your hair, section by section.
  5. Set the waves: Once styled, use your fingers to gently break apart the waves for a more natural look. You can also use a light hairspray to hold the waves in place.

Top Tips for Using a Bed Head Waver

  • Don't overuse: Excessive heat styling can damage your hair. Limit using your waver to a few times a week.
  • Experiment with direction: Change the direction you hold the waver (facing up or down) to create different wave patterns.
  • Let your hair cool: Allow your hair to cool completely before brushing or combing to avoid disturbing the wave shape.

With the right bed head waver and a little practice, you can achieve those beachy waves you've always dreamed of, right at home!

 The Trendiest Fade Haircuts Ideas For Men In 2024 - A Complete Guide

The Trendiest Fade Haircuts Ideas For Men In 2024 - A Complete Guide

fade haircut men

Fade Haircut Men

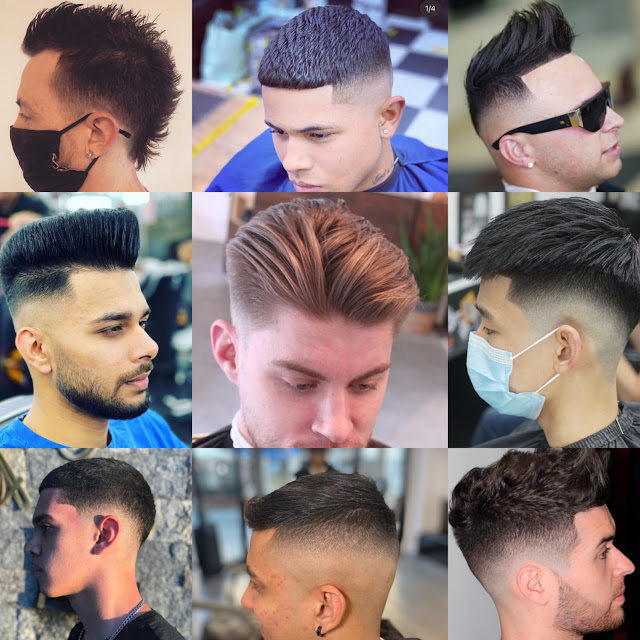
The fade haircut is unquestionably one of the greatest styles available today, thanks to its beautifully tapered appearance and ability to infuse your style with sleek elegance. This haircut can be worn in various ways to fit your taste and personality. The fade on the sides of your head gives you the freedom to style your hair in any way you choose. Additionally, a variety of fade cuts are available. These haircuts are subtle yet elegant, making them ideal for men who want their hair to have a little edge. However, these kinds of haircuts highlight the top hair that gives a voluminous appearance to hair. This haircut is the way to go if you want a simple appearance that nevertheless exudes flair.

All About Comma Haircut - 12 Inspirational Comma Hairstyles For Men

All About Comma Haircut - 12 Inspirational Comma Hairstyles For Men

Comma haircuts are popular among Asian men and are gaining popularity worldwide. Recently, this haircut has gotten much attention since so many K-Pop stars and Korean celebrities use it as part of their signature look. This simple and trendy haircut is known for its specific comma shape of the front hair. This hairstyle was originally associated with men, but as it gained popularity, it also began to be seen in women.

Virat Kohli Hairstyles with Haircut Names

Virat Kohli Hairstyles with Haircut Names

Virat Kohli Hairstyles

 Virat Kohli Hairstyles with Haircut Names

If we ask you to name one of the most famous Indian cricketers of all time, the first name that comes to our mind is Virat Kohli. The former Indian captain has climbed the ladder of success with his hard work, dedication, honesty, and commitment to fitness. Virat Kohli is an inspiration to the young generation. People not only copy his batting style but are also great fanatics of his fashion and style statement.

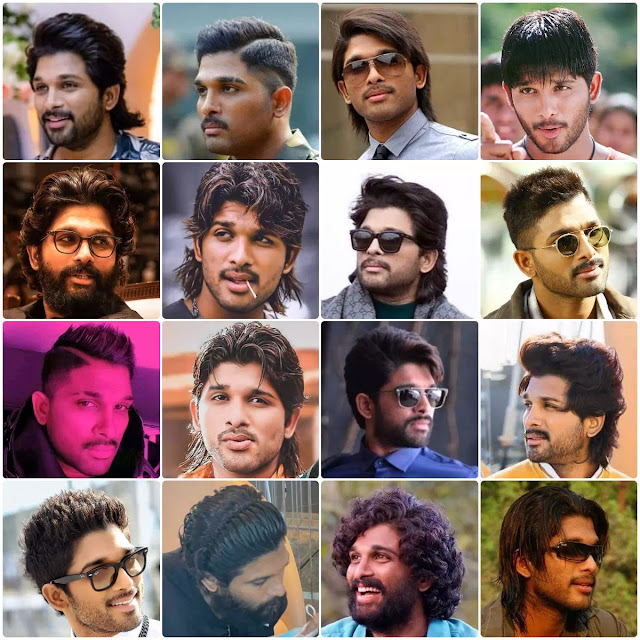
Allu Arjun Hairstyles with Haircut Names

Allu Arjun Hairstyles with Haircut Names

Allu Arjun Hairstyles

Allu Arjun Hairstyles with Haircut Names

Allu Arjun is an Indian film actor known for his work in Telugu cinema. He has been listed as one of the top-10 most popular and commercially successful actors in Telugu cinema. Starting as a child artist and dancer, Allu Arjun has finished more than 15 years in the Telugu film industry. Apart from his dance skills and acting talent, he is also famous for being a stylish and dashing actor. His hairstyles are popular among the youth. He has set new trends for the youth. With his contemporary and bold appearance, Allu Arjun Hairstyles and Haircuts have always been the talk of the town in the industry.

Zayn Malik Hairstyles with Haircut Names

Zayn Malik Hairstyles with Haircut Names

Zain Malik Hairstyles

Zayn Malik Hairstyles with Haircut Names

Zayn Malik is a name you've probably heard while watching television or surfing the web. He is known as a male fashion icon since he joined the popular boy band, One Direction. Ever since Zayn Malik became a superstar, the young generation has been following his hairstyle closely. The styles and music of the singer have changed with time. One thing which always remains in the discussion is Zayn Malik’s hair looks and style choices. From the taper fade to the textured Quiff to the long layers, the Hollywood elite has worn several hairstyles. It is no doubt that he always looks amazing and classy in every hairstyle. If you are fascinated with Zayn Malik and his unique hair looks, here are some of the best hairstyles to try this year:

17 Most Stunning And Epic Styles Of Beard Without A Mustache

17 Most Stunning And Epic Styles Of Beard Without A Mustache

beard without a mustche

Beard Without A Mustache

There is a natural affinity between beard and mustache styles, like gin and tonic. However, a new trend, a beard without a mustache, is a great method to change your ordinary look. This beard style is not an unusual thing. Many men have worn it since the dawn of time. Men don't grow mustaches for a variety of reasons. Trimming and taming the troublesome hair on the top of the lip may be a real pain for some beard aficionados. A beard style without a mustache has additional advantages, such as having less real estate to deal with regarding care and styling. It's also fantastic to make your jaw seem broader and more defined.

Shahid Kapoor Hairstyles with Haircut Names

Shahid Kapoor Hairstyles with Haircut Names

Shahid Kapoor Hairstyles

Shahid Kapoor Hairstyles with Haircut Names

Hair is an essential element responsible for adding smartness and beauty to the face. One doesn't need to do much if they have good hair, but people who do not have need proper care of this natural asset by God. Like other body parts, you need grooming to look good by maintaining and taking care of your hair. If you are looking for inspiration, we have come up with the most loved celebrity of Bollywood, Shahid Kapoor.

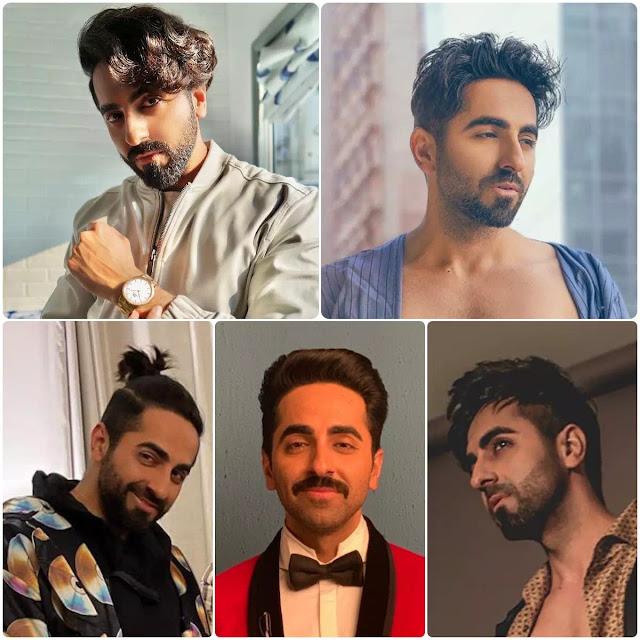
Ayushmann Khurrana Hairstyles with Haircut Names

Ayushmann Khurrana Hairstyles with Haircut Names

Ayushmann Khurrana Hairstyles

Ayushmann Khurrana Hairstyles with Haircut Names

Ayushmann Khurrana is the name known in Bollywood for its versatile acting and hosting. He has earned many awards under his name, including one National Film Award and four Filmfare. Ayushmann started his career as one of the famous radio jockeys and then done its first Bollywood project, Vicky Donor 2012. Whether it is real life or reel, the versatile actors know how to keep up with the latest style trends. From the dressing sense to the hairstyles, Ayushman keeps everything in style. Let's have a look at some of the popular Ayushmann’s hairstyles

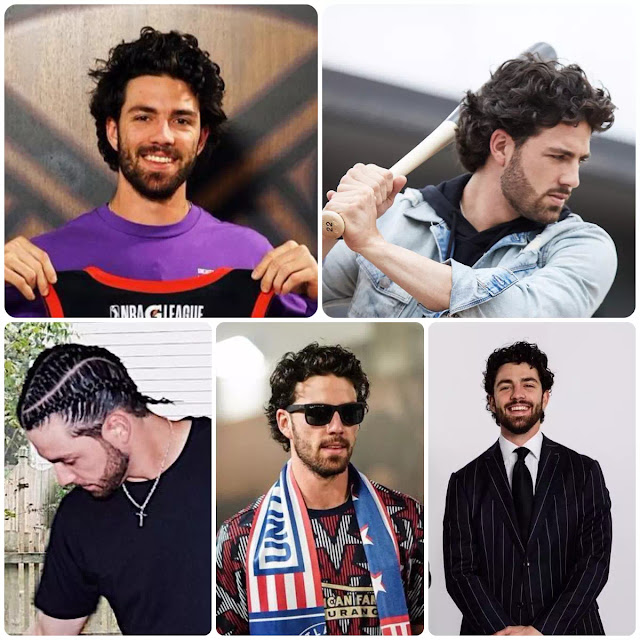
Dansby Swanson Hairstyles with Haircut Names

Dansby Swanson Hairstyles with Haircut Names


Dansby Swanson Hairstyles

Dansby Swanson Hairstyles with Haircut Names

Everyone wants a unique and adorable look to stand out in the crowd. The first thing we all have to admit that we all want our hair to look good but to achieve any hairstyle is a real struggle. Men spent little time in the bathroom when they are getting ready for any event, casual meeting, or job. one good hairstyle enhances their personality from head to toe. Here are few hairstyles of your favorite sportsman Dansby Swanson which you can easily achieve and rock the floor every time.

Guru Randhawa Hairstyles with Haircut Names

Guru Randhawa Hairstyles with Haircut Names

Guru Randhawa Hairstyles

Guru Randhawa Hairstyles with Haircut Names

Hairstyles play an essential role in one's personality. As we all heard the saying, "invest in your hair; it is the crown you never take off." If you want to get a new hairstyle or else you are thinking to cut your hair, we are here to show you the latest hairstyles of a Punjabi Singer Guru Randhawa. You will love the options to try surely with short hair on the sides, or you want a fade undercut with long, medium, or short, there are many awesome cuts and hairstyles of Guru Randhawa you can try out.

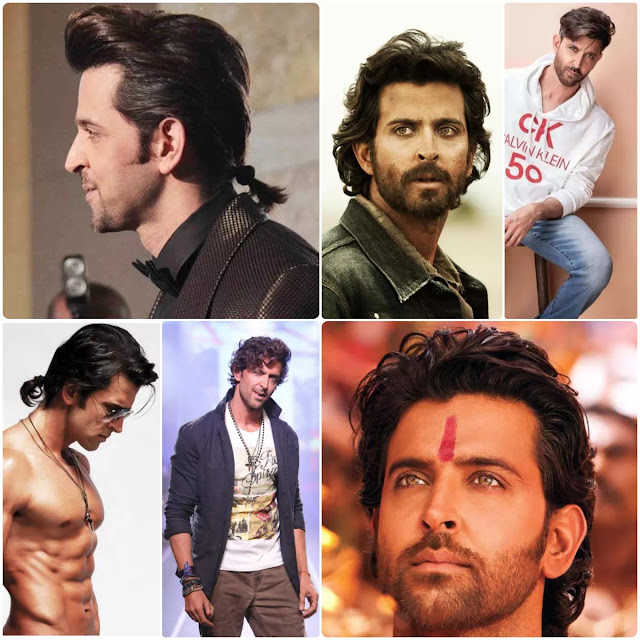
Hrithik Roshan Hairstyles with Haircut Names

Hrithik Roshan Hairstyles with Haircut Names

Hrithik Roshan Hairstyles

Hrithik Roshan Hairstyles with Haircut Names

Hrithik Roshan is the superstar of Bollywood, known for his portrayal of challenging characters and dancing skills. Based on his popularity, he is featured in Forbes many times. He has won many awards, including six Filmfare awards for best acting. Apart from his acting skills, one thing which makes Hrithik the favorite is his unique and tempting hairstyles.

Is your hairstyle boring, or have you ever grown fed up with the same look every day? Are you all set to try a different style but do not where to start? Keep your hair, facial shape, and styling needs in mind! You can get haircut ideas to form Hrithik Roshan hairstyles.

Caesar Haircut

Caesar Haircut

Caesar Haircut

All You Need To Know About The Caesar Hairstyle

When it comes to changing your looks, going for a hairstyle that has stood the test of time is not a bad idea. The Caesar haircut is one of the most renowned styles that reeks of timeless elegance and charm. It might have its origins in Rome's ancient land, but it makes men look dapper to this day.

While many hairstyles come and go, Caesar haircut is a great hairstyle which has and always will be on-trend. The Caesar hairstyle has been spotted by many famous Hollywood actors and is also a hot-favorite of male models. So, what does this hairstyle entail? Which type should you go for? In this article, you'll have a grasp of the Caesar haircut types, as well as how it came to be. What’s more? By the end of it, you might decide to get this as your next hairstyle!

Butch Haircut

Butch Haircut

Butch Haircut

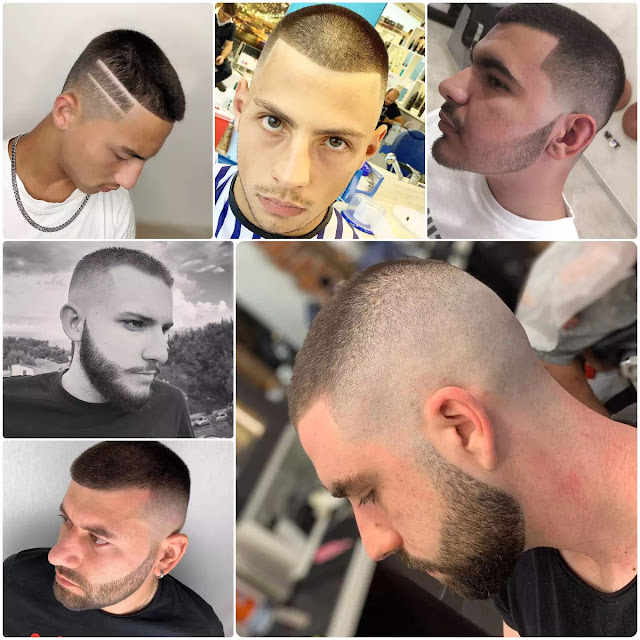
What Is A Butch Cut?

A butch haircut is a uniform cut commonly seen with military personnel or athletes. With butch haircuts, your hair is as short as 0.25 or 0.5 of an inch all over your head.

Out of all the styles, the butch haircut requires the least amount of taming. Whether you have just woken up or come back from a long day, the butch cut stays the same.

Let’s take a look at how this short but strong hairstyle can compliment you.

Bowl Haircut

Bowl Haircut

Bowl Haircut

What Is A Bowl Haircut?

What started as a goofy haircut from the 80s and 90s has now taken off as a bold fashion choice by many celebrities. A bowl haircut has the same length all over your head, giving the appearance of an upside-down bowl. 

 Over the years, many people have added their own twists to the bowl hairstyle to suit their features. If done right, a bowl haircut can be low maintenance and freeing.

Continue reading to learn more about bowl haircuts and how you can achieve the look.